Getting Started
We’re here to help!
This document is the Implementation Guide – User Manual of Tip Top System and Applications and intended to provide all the necessary information to use the system and applications.
The implementation Guide is designed to adjust the Tip Top System and Applications to the requirements of a new customer. You use the implementation guide to structure and organize the implementation of Tip Top Systems and applications in your company.
Implementation guide is a hierarchical structure of the applications areas in the component hierarchy. It contains all the work steps required for the implementation with documentation.
Before Starting
All Tip Top System and Applications requires basic system requirements as mentioned below.
• Any operating system
• 2GB RAM available
• Browser – Chrome / Mozilla Firefox
Other operating system users like Apple (Mac) can use Safari Browser.
Get Training
This chapter covers basic understanding of all Tip Top Applications, their features, forms layouts, URL and Images.
Below are the lists of all Applications:
• Tip Top Platform - Done
• Tip Top People
• Tip Top Mail
• Tip Top Office (Workspace)
• Tip Top Manager (HUMS)
• Tip Top WIKI (KMS and Analyzer)
• Tip Top Business (SERP)
• Custom ERP
• Tip Top Advisor (ECRM)
• Tip Top Drive
• Tip Top Cabinet (DMS)
Navigation in Tip Top Application
How To Navigate in Tip Top Applications?
A. Header Navigation – Application Navigation

OR

Technology stands for Tip Top Platform
Integration stands for Tip Top ERP ( Tiptopmanager.com)
Planning stands for Tip Top Business (SERP)
Technique stands for Tip Top Wiki
Operations stand for Tip Top Mail
People stand for Tip Top People
Search button assist user to navigate to any page directly by typing name of page.
B. Module Navigation
Account Set Up
Setting Up Your Account
All Tip Top applications and Software’s are access through license (can be Demo or Purchase) wherein system create an identity based on Tenant.
Tip Top Platform gives feature of creating multiple company hierarchy within a single Tenant and gives a single access to all application with the use of SSO (Single Sign On).
Customer can purchase multiple license for individual enterprise based on their requirements however each license will have separate access identity but keeping user credential same for all licenses.
Below are the Tasks which will require completing the license process:
• How To Request For Demo or Purchase
• How New User Register
• How To Buy License
• How To Activate License
2.1 How To Request For Demo Or Purchase
Overview:
Request For purchase or demo can be communicated via many ways, however this section only covers how customers can directly approach us from our website.
Our Website – Tiptopplanet.com, is a single source online information site from where customers can know about our products and communicate us on any subject.
Get Started:
2.1.1 Go To www.tiptopplanet.com website.
2.1.2. Click on Request a Demo.

2.1.3 Fill the form and Submit for request demo.

2.1.4 After Submit the Request Demo, the Thank You acknowledgment message will appear.

2.1.5 Continue button will take you back to request demo form, if you have more requests submit the form else explore Tiptopplanet.com website.
Attention:
Once Tip Top Sales Team will receive customer demo request, they will contact customer and send an invitation message for customer to register on the site for accessing services.
2.2 How New User Register
Overview:
Our Registration on Tip Top Platform is through invitation message send by our team or existing user.
Attention:
All Tip Top Applications can be accessible to register users only hence registration process is a primary step to proceed for accessing Tip Top Applications.
Get Started
2.2.1. Tip Top Sales Team will send invitation message on email address provided by customer in Request Demo.
2.2.2. Customer Will Receive Email along with Registration link from Sales Team.
2.2.3. Click on Link provided in invitation message for registration.

Link will direct to Register page.
2.2.4 Fill Register Form.
Register Form fields like (First name, last name and email) comes auto selected and rest information (username, password etc.) needs to be filled by the user.
All The fields are mandatory and also user has to check mark the Terms and Condition “I Agree”.
Once all fields are filled, click on submit.
2.2.5. Account Activation
Once user click on submit button an alert in green color generates with message "Success you are successfully registered, please verify your account. Thank you."

2.2.6 User Login
Now user writes the URL tiptopplatform.com and fills the credentials like “username, password and click on “sign in" button in the login page to login.
There are three fields
Company Name: only to be filled for company user who has been linked to the company
Username : for all users
Password : for all users
Attention
User will generally login without company Name as user is still not linked to any company.
2.3 How To Create and Update My Profile
Overview
Tip Top People is a Profile Management Platform where Users can maintain their profiles and employment Records.
There is a strong need of a De-coupled Profile Management platform where all the Human resources can maintain their own profiles reducing the load on the organization HR department where they simply have to just on one click on boarding the HRIS can automatically be updated.
The Tip Top People provides a Profile Platform that solves this major problem of the organizations.
The Platform provides following features
• Profile Management
• CV Management
Once user account created on platform, user has to build his/ her personal profile on tiptoppeople.com
Get Started
Step 1. Go To tiptopplatform.com

Step 2. Click on Login and enter username and password.
Company Name is optional for Business User.


Step 3. Click on Edit Profile.

Step 4. Click on My Profile.
After Click on Page, it will show a List of profile pages on left section of Page.
Click on Personal Information
After click on edit profile option user navigates to personal information page where name, surname and email address remains auto selected (already filled earlier) and rest all the information like DOB, Address, Gender, Marital status and etc. have to be filled by the user.
Also the user has to select ISPUBLIC checkbox for his profile to be visible to others
After filling the required information’s, click on save button.

Once clicked on save button an alert will generate like "Personal information saved successfully." and after click on "Ok" button.

Step 5. Click on Qualification
Once Personal Information saved, user navigates to Qualification page where first he has an option to select radio button "Are you eligible or not." with option yes and NA. User can choose these options accordingly. If suppose user selects ‘yes’ then he will be allowed to fill all the information like Institution, Aggregate, percentage etc. and click on insert button as shows in tabular form.

Simultaneously if user has more qualifications than he can fill accordingly in the same manner and that all will be reflected in a table. Once he fills entire qualification details and clicks on "save qualification button”, all qualification details will be saved and user navigates to experience section.
Step 6. Click on Experience
Next tab will be for Experience Information, if user does not have any experience, he will have to click on ‘NA’ button and if user has any experience, than it will be added accordingly, these inserted record show in table by click on "Add experience button."

Again user clicks on save experience button and an alert will generate "experience saved successfully" and page navigates to reference section.
Step 7. Click on Reference
In reference section user can give any reference of his / her known person by entering his/her name, last name, designation, company name and etc. After click on add reference button information will be shown in the table.

After filling the reference information user will have to click on "save reference button" and an alert will generate "reference information saved successfully." After click on "OK" button user will navigates to family details section.
Step 8. Click o Family Details
In family details user defines about his/her marital status and details about his family members and relationships.

Again information entered by the user will be shown in table and he saves it accordingly by click on "save family details" option.

Step. 9 Click on Additional Information
In additional information option user fills all the information related to his/her career goals, most motivated work, strong points etc.

At any time user can choose desired record type form the dropdown menu and can write the description about the selected particular category.
After filling all information user clicks on save information page, alert generates as "Additional information saved successfully."
After click on ‘OK’ button again an alert message generates as “Your profile is updated successfully. Changes will reflect after sometime or after re login to your application. Do you want to re login?"

If user click on "No" button then he will remains in the same page and if clicks on "Yes" it navigates to index page of tiptoppeople.com
2.4 How To Change Password and Secret Question
Overview
This section provides information on changing user password and secret question.
Get Started
Step 1. Go To tiptopplatform.com

Step 2. Click on Login and enter username and password.
Company Name is optional for Business User.


Step 3. Click on Change Password.

Step 4. Show Below Page with two options; Change Password and Change Secret Question.
If User want to change both Password and Secret Question, than has to enter details in both form else can simply change with new password and exit.

Change Password
Enter current password
Enter New Password – Make Sure password should contain One Upper case, One Symbol and Alpha Numeric.
Enter Confirm Password – Enter Again New password.

Click on Save Button.

Page will show message “Password Successfully Changed. Thank You”.
Change Secret Question
Click on Change secret Question button, below page will appear.

Enter the Current Password
Enter Security Question
Enter Answer
Click on Update Button.

Page will show message : “Secret Question and Answer Successfully changed. Thank You” .

2.5 How To Buy License
Overview
This section covers steps wise instruction to buy or demo Tip Top Application License.
Get Started
Buying Business License
After updating his/her profile successfully user Release for the Tiptop platform software.
User can click request demo from www.tiptopplanet.com
User will be sent a link for Buy license
User has to enter username and password and click on sign in button to login.

After logged in user navigates to the Buy License page

In this page user has to fill all the information mentioned like
Type of license: Free Trial or License version.

Validity: For one year or more.

Application: Different categories of applications like Tiptop manager; Tiptop Office, Tiptop adviser etc. are given over there in drop down menu. These are the various applications we have and user can select the required application he wants to subscribe license for.

No of users: How many members would like to Release/ subscribe it

Then, click on add option mentioned below screenshot (Blue color button) then Application type, no of users show in the table
User could also delete the "added user" if he wants to make some changes to Release the software.

After click on add button user will successfully add all mandatory information like type of application, no of users, validity and license type.
Apart from this, user needs to fill other general information too like company and contact person information. Company information like: Required information like company name, address, city, state, country, zip and website. Contact information like: Information like First name, last name, email, address, city, state, country and zip.

License Key Generation
After filling the entire information, clicked on save button an alert message will generate as "Success License key generated and has been mailed to your mail account."

You can check your mailbox for message of license key generation.

2.6 How To Activate License
Overview
This section covers as how provided license key can be used to activate the license.
Get Started
Step 1. Click Activate License

Step 2. After clicking on "License Activate" button user enters License key, username and password. After enter all these credentials he clicks on check option.

Step 3. Once user click on check button, rest data of user (like company information, contact person information and License) get auto selected (as filled by user previously in buy license page) and user clicks on Activate License button for the activation of license.

Once user click on Activate License button an alert generates as "Success License is activated."

Attention
Admin assigned the connection string of current activated user by clicking "Assigned application to OU."

After Successful Activation of Account following Tasks need to process before setting Attendance system:
1. Setting Organization Structure
2. Setting Role and Permission
Setting Up Time Clocks
Before Tasks
Set Up Forms – Company Time
https://tiptopmanager.net/admin/companyform?pageId=907
Attention: Page shows all companies which are created in Tenant Organization Structure in Tip Top Platform. Refer Topic …. Page No.
Page has search functionality by Name.
Click Edit to update the company form for updating details or viewing the details.
Update Company Form

Pre Filled Fields: Name, Parent Company, Address and Phone. These fields are filled from Company Form in Tenant Organizational Structure in Tip Top Platform. Please Refer Page.
Name and Parent Company Fields are not editable, as it will affect the Organization Structure so if there is any change in Name and Parent Company than user can go to Tip Top Platform and edit and update the details in the form
Fill details like;
• Fax – Enter Fax Number else skip
• Email Address – Enter Email Address else skip
• Year Of Establishment – Enter the year else skip
• Website – Enter Website address else skip
• Financial Start date (Mandatory Field) – Enter Financial Year Start Date based on company financial calendar.
• Financial Close date (Mandatory Field) – Enter Financial Year Close Date based on company financial calendar.
• Open Time ( Mandatory Field) - Define company Office Opening Time
• Close Time ( Mandatory Field) - Define company Office Closing Time
• Weekly Off per week ( Mandatory Field) - Define Numbers of Weekly Off Applicable in Company Calendar.
• Attendance Start Date - Define Starting Date from where Attendance System will start
• Weekly Off ( Mandatory Field) - Define Days when Weekly off will be applicable
• Half Hours - Define Hours when to mark half day
• Absent Hours - Define hours when to mark absent day
• Number Of Break( Mandatory Field) - Define Number of breaks applicable in Shift
• Number Of Holidays ( Mandatory Field) - Define Number of holiday applicable in company calendar
• Minimum Break Interval ( Mandatory Field) - Define Min. period of Interval of Break
• Maximum Break Interval ( Mandatory Field) - Define Max. period of interval of break
• Early Hours before shift in Allowed - Define hours to relax on early going before shift
• Late Hours after shift out Allowed - Define hours to relax on late coming
• Overtime Display - Define Overtime is applicable in minutes/ hours
Update – All update all details filled in the form.
Cancel – Close the form
Settings: General/ Scheduling / Attendance
Set Up Forms
• Attendance Status
• Leave group and Default Leave Group
• Leave Type
• Shift Master
• Leave Group Shift and Default Leave Group Shift
• Irregularity Status
How To Add / Edit/ Close Attendance Status?
Attendance Status
https://tiptopmanager.net/Admin/ListType?type=1&pageId=1313
Definition:
‘Attendance Status’ defines the category of each type of attendance available to employees such as Present, Absent, Half day, Leave, Holiday, Weekly Off, etc.
Attendance Status Page View

Topics Includes;
1. Add Attendance Status
2. Edit– Use for edit the existing attendance status.
3. Delete – Use for delete the existing attendance status.
4. Set Payroll Rule – Refer How to Set Payroll Rule in Attendance Status? Page No.
5. Set Setoff Rule – Refer How To Set Setoff Rule in Attendance Status? Page No.
1. Add Attendance Status
Getting Started
How to Creating New Attendance Status?
1. Go To https://tiptopmanager.net/Admin/ListType?type=1&pageId=1313
2. Click on add Attendance Status
Attendance Status Form

3. Above image showing blank form of Attendance Status wherein Details need to Fill like;
1. Company – Select the company from the List.
2. Attendance Type – This is preconfigured records as a Meta data and forms the basis of the roster module.
Note: Company can change the name as per their roster policies however their basis nature will be the root attendance Type.
3. Display Name: Enter the Name for attendance status as per company own roster policies. As this Attendance name will be visible on all the roster forms.
4. Description: Enter description to add the record definition.
5. Paid (Y/N): Checkbox – Select Yes if Attendance Status is to be paid Or No if not paid.
6. Earned (Y/N): Checkbox – Select Yes if Attendance Status is to be earned or No if Not Earned.
7. Restricted:?????
8. Paid Percentage – Enter percentage to be paid if selected checkbox Paid in Paid(Y/N) Field.
9. Work Hours – Select from Time of working hours. (Click on Time Icon and select the hours)
10. Half Hours – Select from Time of working half hours. (Click on Time Icon and select the hours) *** It defines company policy on Half Hours.
11. Absent Hours – Select from Time of Absent hours. (Click on Time Icon and select the hours)
*** It defines company policy on Absent on Working Hours.
12. Early Half Hours – Select from Time of Early working half hours. (Click on Time Icon and select the hours) *** It defines company policy on Half Hours on Early Going.
13. Early Absent Hours – Select from Time of Early Absent hours. (Click on Time Icon and select the hours) *** It defines company policy on Absent on Early Hours.
14. Attendance Type – Checkbox – Select Any from Is Present Type / Is Holiday Type / Is Leave Type as per the nature.
15. Show When No Balance – Checkbox – selecting means the record will visible on Shift Irregularity form even there is no Balance of adjusting the attendance record. (Please refer Shift Irregularity)
16. Expiry On – Select Expiry period by selecting period and Occurrence. (It is not mandatory and only for attendance status records which need to be expiry on particular period)
17. Active – Checkbox – Select means making the record live and useable.
Save – Click Save button to Update and save the filled records.
Cancel – To cancel the filled records.
2. Edit Attendance Status
It is only performed for use for edit the existing attendance status.
Steps:
1. Go To Attendance Status Page - https://tiptopmanager.net/Admin/ListType?type=1&pageId=1313
2. Select Company, Status and Click on Search.

3. Choose Attendance Status from the Search List. Click on Edit Button

4. Edit Page and showing pre filled fields, User can edit the fields’ records and Click on Save Button.

3. Delete Attendance Status
Use for delete the existing attendance status.
Steps:
1. Go To Attendance Status Page -https://tiptopmanager.net/Admin/ListType?type=1&pageId=1313
2. Select Company, Status and Click on Search.

3. Choose Attendance Status from the Search List. Click on Delete Button.

4. Dialogue box will appear for Yes or No.

5. If Attendance Status record is used in other roster forms than it can’t be deleted as it is a strong validation by system. Only after removing its use from other roster forms than only the record can be deleted.

Shift Irregularity Mapping
Refer Section Mapping Irregularity Status with Attendance Status Page No.

Set Payroll Rule – Refer How to Set Payroll Rule in Attendance Status? Page No.
Set Setoff Rule – Refer How To Set Setoff Rule in Attendance Status? Page No.
Leave Type
https://tiptopmanager.net/Admin/ListType?type=13&pageId=164
This form is only used to check the Leave Type which was already updated on Attendance Status form.
Only addition is Holiday Checkbox – Which only check if the attendance status is holiday type.
Leave Group
https://tiptopmanager.net/Admin/LeaveGroup?pageId=478
Definition:
It is a set of leave policy or template in which attendance status are grouped based on company need. In an organization, employee leave group are multiple subject to; their Hierarchy, Work Tenure, etc. Hence, organization required different leave groups having different leave policies for different employee groups.
Topics Covered:
• Add Leave Group
• Edit Leave Group
Leave group Page View:

Add Leave Group

1. Click on Add Button and Above Form Will Open.
2. Company: Select Company from the Drop Down Field.

Once company is selected, the form will display all attendance status opened under selected company. It also shows filled fields like Work Hour, Half Hour, Absent Hour, Early Half Hour and Early Absent Hour.
Now, choose by check on Master Checkbox to only those attendance statuses which need to add in this new Leave group. After selecting the desired attendance statuses which are marked check in Master Checkbox, user need to define quantity of each attendance status.
Define Quantity by selecting period from Option Field from drop down and against how many No. of working days / option and then enter Quantity in No. Of Leaves.
3. Name: Enter Name of Leave Group (Name can be any Alpha Numeric based on company need).
4. Template Description – Enter description
5. Weekly Off: Select Checkbox on which Weekly off will be marked.
6. Effective From: Select Date from which The Leave group will be active and effective
7. Click on Active button.
8. Click on Save for Updating all filled entries or Click on Cancel.
9. Set Default Leave group
To define a default leave group for a company, this form is used. The purpose behind adding this form is when any new employee joins, this default leave group should be assigning to employee or if HR forgets the system automatically assign default leave group to new employee.
In this form, company leave group or leave groups will display and a checkbox in column ‘Is Default Leave group’. Mark check on any Leave group from the list and define it as default leave group

Edit Leave Group
https://tiptopmanager.net/Admin/LeaveGroupEdit?id=99

1. Go To Leave Group Page - https://tiptopmanager.net/Admin/LeaveGroup?pageId=478
2. Choose any Leave group and Click on Edit Button.
Attention:
Leave group can only be edited when all the opened shifts under particular leave group are passive. To make shift passive, form has Button ‘Passive Shifts’ user need to click on Passive Shifts button and once editing is done than need to click on button ‘Active Shifts’ to make all shifts active under particular leave group.
3. Modify any Fields as required and Click on Save.
Make sure Active Shifts button is clicked once Leave group Editing is saved
Shift Master
https://tiptopmanager.net/Admin/ShiftMaster?pageId=249
Page View

Add Shift

1. This form is for defining Shifts. It will setup employeeshift with breaks.
2. On this form, Company can define its working shifts/ hours.
3. First need to select the company name from drop down menu. Then User will select Leave group and attendance type from drop down menu.
4. In Shift Time, User will enter the working hours, In time, out time and number of breaks company wish to allow.
5. Break section, need to enter out time and in time during the break.
6. Here, User can also enter Lunch or Dinner shifts in time and out time wise.
7. Also here check the week day for week off holiday here too.
8. Others: User can define the rule of marking Absent or Half day depending upon the hours any employee worked in a defined shift. For Half day User can define that minimum how many hours needed to consider his attendance in half day and how many hours needed for absent status consideration.
9. Click on SAVE or Update button to save this record as shift status.
Edit Shit Form

Go to Shift master page and select the desired Shift on editing needs to be done.
Edit the fields or field as required and click on Update Button.
Save as New Button will create new shift in system.
Leave Group Shift
https://tiptopmanager.net/admin/Leaveshift?pageId=2819
Page View

• Create and Name Single default Shift for Particular Leave Group which will automatically allotted to employee when leave group is attached.
• Using this form User can create default shift under particular leave group.
• Select Company and Leave Group for drop down list.
• Choose single date in both date fields ( From date and To Date)
• Click on Submit Button

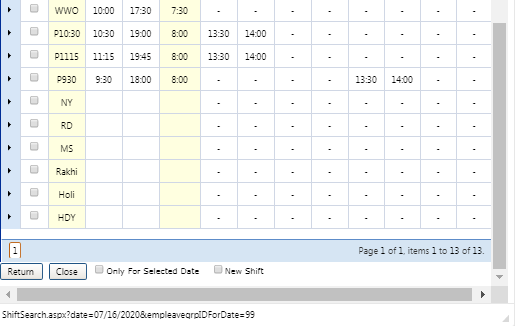
Click on Shift Button and a popup page will open showing list of all shifts created under the selected leave group.
Choose any shift by mark check on the checkbox.
Click on both checkbox of bottom i.e. Only for selected date and New Shift.
Click on return Button.

Now form will show shift which was selected from the list showing in previous page.

Click on Submit Button on the bottom of Form.
Now this Shift is created as default leave group shift and will assign automatically to all New Employee joined in company.
Irregularity Status
https://tiptopmanager.net/User/ListType?type=50&pageId=2818

Irregularity Status Form

Mapping Irregularity Status with Attendance Status
It is a roster additional feature where Irregularity is mapped with attendance Status.
Irregularity: It is a list of events in which employee happen to irregular on duty, the system has defined major irregularity events however company can add more as per their work system.
In This section, showing all attendance type and irregularity list wherein company maps particular Attendance Status with Single or Multiple Irregularity and Attendance Status.
Below Image showing “Absent” mapping with multiple attendance and irregularity and also checkbox for remarks required.
If when company personnel correcting Shift Irregularity and while marking needs to define remarks for documenting the event than check the checkbox.

Download Mobile App Resource Guide
Employee Attendance Punching System
• Manual Punch in System
• Manual Punch on PC
• Mobile App
• Others Like; Facial Recognition Device, NFC, Biometric.
Firstly to Assign Employee Attendance Rights of Type Of Punching Mode
Assign Rights:
https://tiptopmanager.net/Roaster/EmpAttendanceRight?pageId=2876

1. Go To Employee Attendance Rights Page.( Url - https://tiptopmanager.net/Roaster/EmpAttendanceRight?pageId=2876)
2. Select Company, Department and Employee
3. Select Authentication from the list.

4. Click on Insert and then Click on Update data
Approve Rights:
https://tiptopmanager.net/Roaster/ApproveAttendanceRight

1. Click on Approve Button
2. Click on Approve Data

Once assign and approve employee attendance mode than go to Mobile app and follow the instructions
Mobile Attendance Application
API driven Integrated and AI based Mobile Attendance and Human Asset Tracking Application Authentication using Human identification, location Tracking and Time Recording Service (AHLTS)
Attendance Application:
Overcome the problems of tracking your employees through our efficiently designed location based attendance application, real time tracking features to support Geo-fencing and Real Time Geo-tracking which delivers a guaranteed productivity from your workforce.
What we deliver with Attendance Apps:
Maintain records of punch timing along with the location data of respective employees to ensure the effective time utilization and avoid any kind of time thefts. With the implementation of our attendance apps can track employees who are working in the office as well who are field workers, get their punch timings and punch location tracking easily within a single window.
1. Increase Productivity
Increase transparency of working scenarios with real time location tracking which allows managers to give instructions for taking out productive work from employees
2. Real Time Location/ Live Location Ping and instant messaging
Get the current location and route details of your employees on fields or are on business trips using ping service. On real time basis employee/ supervisor can share or request to share his/ her live location to supervisor/ manager to guide them for better working and improved efficiency.
3. User/ Employee Authenticity validation using Bio Matric and Device Mac Address
Authenticate user by his/ her own Mobile device while marking his/ her attendance along with finger scanning. It will safe guard from proxy attendance marking.
4. Auto Punching in Office
With location based punching you can virtually fence all your office premises to enable auto punching with your employees mobile devices along with respective locations.
5. Multiple Platform
We have made our application to support any kind of mobile devices on platforms like Android and iOS so that you can install it on any mobile devices, or tablets of any brands.
What to expect from TipTop’s Mobile Attendance App Solution?
TipTop’s Mobile Attendance solution is robust and efficient and designed for all type of industries. Your company can manage employee’s attendance, payroll cycle & performance analysis from TipTop’s centralized cloud-based attendance app which is 24 X 7 accessible and scalable.
Tip Top Mobile App User Manual
Application is currently working for Geo Fencing, Bio Metric, NFC Tag, Mobile Device Mac address and for Manual Attendance user validation and for punching their attendance.
Registration Process:
A) Location Registration
B) Finger Registration (Bio Metric Registration)
C) Mobile Mac Address Registration
D) NFC Tag Registration
A) Registering Location using Mobile App:
- Initially for using Geo Fencing Location tracking and authentication services, we need to register Location first.
- For Registering Location: Only Useristrator/ Supervisor are authorized to do so. (User Roles and Permission needs to be set from Tip Top Platform)
- User/ Supervisor will login into the application using his/her TT Mail credentials.
- As this app is API driven, so automatically we will have Locations which was already there into the web application.
- Already available Locations, now needs to be registered as Parent location. And inside that parent location we can define sub locations too which comes under that parent location radial area.
How to Register Location:
- To register any location, only Useristrator having the rights. So he will login with his/her User credentials into tiptop mobile application

- Enter company name in first text box as indication to, Enter user name and password than click on Sign In button given at the login page of this app.
- Once Logged in, at the bottom of app menu open “Register Location” menu item.

- After click on Register Location Menu item, the concern page will be displayed with the available text fields as Location Name. Parent Location, Category, Department, Fence Radius and Status etc.

- In place of Parent Location drop down menu, it will display the name of locations which is already open/ available to get registered. So User needs to register Parent Location first through the mobile app.
- Select Location to register from drop down menu (existing locations will be displayed in dropdown)

- Select the Category from the drop down as Indoor or Outdoor.

- Select the department where this particular Location falls in or relate to. Department list will be displayed in drop down menu.

- Once Location is selected than app will automatically fetch its longitude and latitude and it will be displayed in the space provided already in app.
- Enter the geo fence area (radial geo fence distance needs to be entered here- it must be set from the central point of registering location in meters only)

- App will automatically get the longitude and latitude of that particular location and then click on ‘SAVE’ button given at the bottom of this page.
- “Location successfully registered” alert will be displayed.
- Now the parents’ location has been registered successfully.
- Once parent location gets registered successfully, now we need to register Sub locations under that registered Parent location geo fence.
For Registering Sub Location under Registered Parent Location:
- Enter the name of Sub Location in text box as given

- Select the registered parent location from drop down menu under which this Sub location comes (within the registered and assigned Geo Fence Radios of parent location)
- Like if Parent location’s radius is 30 Meters than its sub location should be within that 30 meters (5-10 meters under that geo fence)/ if sub location is outside of Parent location geo fence then app will throw an alert message that “Sub location must be in Parent location fence area”.
- Enter the sub location fence radius are and fill the required details on that page.
- Click on ‘SAVE’ button and then an alert message will pop up like location registered successfully.
B) Register Fingers of Employee (For Bio Metric Authentication and Validation)
- Useristrator is having rights to register employee’s fingers through the mobile app.
- User will login with his/ her credentials into the app.
- By selecting Employee Registration Menu: He needs to select Name of Employee from the drop down (In dropdown all the available and assigned employee’s name will be displayed and User can search particular employee name from there)

- User will select the name of employee whose Fingers he is going to register
- All available employees’ list will be displayed in drop down menu, and User can select the name of employee who’s Finger he want to register using app.

- Once Employee name is selected its associated Employee ID will be displayed in the text box given.

- On the next option, app will ask to select the mode of attendance, User want to register for.

- Here, the list will be displayed for the permissions which User has already granted to this particular user to punch his/ her daily attendance.
- For finger registration, User needs to select Biometric option from the drop down.
- Once Bio Metric option is selected from the drop down menu, this will give pictorial option to select the number of figner along with right or left hand selection.
- Which ever Finger employee want to register for himself, User needs to select that finger number from the given option, User will click the particular finger number as per given hand.

- Initially the color of all fingers will be displayed in RED color as they are unregistered fingers in app, while once any finger gets registred this will be displayed in GREEN color.
- For Registering finger, User needs to attach Mobile device with Bio Metric Attendance device (We have used StarTek FM 220U device for the same which is Aadhar approved device already)
- Once we attach Bio Metric device with the Mobile, it given an elert to allow the device to communicate with the app, so user needs to click on allow button.

- Once User selected the number of finger, employee needs to put his selected and right finger on the space provided for scanning.

- Once employee puts his appropriate finger on Bio Metric device, app start scanning and registring that finger.

- Once scan completed, app displayes a messge as “ Finger Scanned Successfully”

- Once finger scanned successfully, User will click on Save button and this will save the finger data inside the app for particular employee. (Finger Registered Successfully now)
- User and employee can register multiple fingers using this app, and the registered fingers will be displayed in GREEN color while un registered will be displayed in RED colour.
C) Mobile Mac Address Registration through App:
For validating attendance we have Mobile Mac address validation too. In which Employees’ Mobile Mac address will be registered using app, so that employee will be able to punch his/ her attendance by using his/ her registered Mobile device only. So this will validate and authanticate the employee for punching his/ her attendance.
- For registering employees’ Mobile Mac address, User/ supervisor will login on the app (Employees’ Mobile app) with his/ her login credentials
- User/ Supervisor needs to select the employee name from the drop down menu for whose Mobile Mac address he is going to register/ mobile belongs to which particular employee.
- By selecting Employee Registration Menu: He needs to select Name of Employee from the drop down (In dropdown all the available employee’s name will be displayed as it is coming from Employee Master Data API from Backend)

- User will select the name of employee who’s Mobile Mac Address he is going to register from the drop down menu.

- Once Employee name is selected its associated Employee ID will be displayed in the text box given.

- On the next option, app will ask to select the mode of attendance, User want to register for.

- Here, the list will be displayed for the permissions which User has already granted to this particular user to punch his/ her daily attendance.
- Here, User will select “Device Mac Address” option.

- Once Device Mac Address option is selected from the drop down menu, this will automatically fetch the Mobile Device Mac Address and will display the same on given text box.
- User will click on ‘SAVE’ button to save this Mac Address for respective employee.
- This way employee will be able to punch his/ her attendance throug only registered Mobile device.
E) NFC Tag Registration
Location Aware Services-
The location aware services can be used to acquire a user’s location. Employee/ User’s position can be still determined using mobile phone with the help of NFC (Near-field communication) positioning devices.
On selecting NFC, supervisor manually insert/write data inside the NFC Tag and its location need to be registered first against any employee who is allowed by the Useristrator to punch his/ her attendance from any particular location only. NFC tag needs to be write/ value need to be inserted by the User inside the NFC tag regarding employee Name, Location and Category where such employee is allowed to present physically to punch his/ her attendance.
- User will login with his/ her credentials into the mobile app.
- Once User logged in, he will go for employee registration menu icon.

- Here, User will write the data/ registered employee details, location and category inside the NFC tag.
- First User/ Supervisor will select the name of employee from the drop down who is allowed to punch his/ her attendance through NFC Tag.

- Employee’s associated Employee ID will be displayed once employee name selected from drop down menu.
- User will select the mode of attendance he is allowed from ‘Select type of attendance/ mode of attendance. Here User will select NFC type.
- Once NFC Tag mode is selected, Employee Registration page will open.

- On Employee Registration page, User will select the Supervisor name from the given drop down menu.
- Location category need to select from second drop down menu as Indoor or Outdoor.
- At Select Location, User need to select the location name which is already there in drop down menu item. These location manes will come from tiptop platform back end only. The NFC Tag will be written from here with the values including the location where NFC tag need to be fixed, Employee name who is registered for that location to punch his/ her attendance etc

- Finally User will select the type of NFC Tag he is writing inside with the provided values.

- Once User puts the required information regarding Employee Registration and NFC Tag details, he needs to write the same into the NFC Tag. For writing those parameters into the NFC Tag, Mobile with app need to be in the range of that NFC Tag. Means as NFC Tag will come near to that mobile device, app will automatically display the alert that “NFC Tag Found”, and now User will click on SAVE button to write those parameters into the NFC Tag.

- Once saved all those parameters, app will display the alert like “Tag Written Successfully”. By this way Employee and Tag will get registered into the App

: Attendance Check In/ Check out Process:
Once Employee get registered for Location, Device Mac Address, NFC Tag and by Biometric device finger registration, now employee can check in/ checkout from the Mobile app with the attendance rights he is allowed to do so.
For User Validation and authentication, we have provided multiple combination methods of user validation or authentication. User or organization can use any method of check in/ check out independently or in combination
: Attendance Check in / Check Out process through available or allowed Methods:
A) Attendance process using Bio Metric, Location, Device Mac Address method (combination of 3 validation)
- If employee is already registered and allowed by the Useristration/ supervisor for Bio Metric, Location and device mac address method of attendance check in/ checkout, he will login with his own credentials into the mobile app.
- For punching attendance he will have to select check/ checkout menu item from the home screen.

- Once user clicks on this icon, this will give the page to mark his/ her attendance.

- Here, employee will select type of attendance/ mode of attendance, he is allowed for.

- Once employee selects his/ her mode of attendance, complete page of check in/ check out will be displayed.
- Now on second option, employee need to select the location from the drop down (location), he is already registered for punching his/ her attendance by the User.
- If employee is allowed to mark his/ her attendance from multiple locations. Then here in drop down he need to select the location currently he want to punch his/ her attendance at that moment. Otherwise if he is allowed to mark attendance from single registered location that it will come by default in that text box.

- Once user selects his current location to mark his attendance, app will automatically fetch his current location for which he was registered for. We have incorporated Google location map inside the app to display the live location of employee. If employee is within the registered geo location range, than google map will show the pin location. If employee is outside of the fence area, than app/ google map will show the employee location as out of defined geo fence area. Out of fence area app will not allow the employee to mark his/ her attendance and will display the alert as first “Go inside the fence area to mark your attendance”.

- If user is inside the defined and registered geo fence area, than app will validate his location automatically.
- Now user need to connect his mobile device with Bio Metric attendance device, once user connects the bio metric device with the mobile, it will give an alert to allow the device to communicate with the mobile app. User will click on OK button to give the access permission.

- Now user will use his/ her registered fingers to scan for marking his check in or check out. Registered fingers will be shown in GREEN Color while unregistered finger will be shown in RED color.
- If more than one fingers are registered already inside the app, than user will select the number of finger he want to use for marking his attendance from the given picture of hand. Once user choose the particular finger, its finder ID will be saved inside the text box provided.

- No user will go for check in or check out of his/ her attendance. First time only Check In button will be enabled to mark check in only and check out button will be disabled. (without marking check in, check out is not justified)
- Once user click on check in button, automatically Bio Metric device scanning panel activated, and app will display an alert message to user to put his registered finger on scanning device to match his finger with the already registered finger.

- Once user’s finger gets match with the Registered Finger, app will display the message like” Scan Matched”
- Once scan matched, app will again display an Alert with “Attendance Checked in” with Date and time of attendance marked. And by this way user will be able to mark his/ her attendance.

- Once attendance is marked, it will be displayed in the Grid provided to record the attendance data along with Date, Check in/ Check out time, and with location including its latitude/longitude.

- The same procedure will be used while user wants to mark his/ her check out.
- One more validation will work simultaneously along with Location and Finger validation which is Device Mac Address.
- Until and unless user is using his registered mobile device (Registered by Mac Address), he/ she will not be able to mark his attendance. Mobile Mac Address authentication is also associated with this attendance combination. App will allow only if authentic and registered mobile device is used to mark the attendance, otherwise app will again display an alert like: “Device Mac Address not matched”
B) Attendance process using NFC Tag Method
If particular employee is registered to mark his/ her attendance through NFC Tag only, than user needs to tap his mobile device near or onto the NFC Tag, so that mobile app will read the data available inside and written inside the tag in order to validate the user and its location. In this case user needs to be present physically very near to NFC device for validation and authenticity of its attendance at that particular location/ area
- User needs to go near the registered and placed NFC area first.
- Now, user will login into the mobile app using his/ her login credentials.
- User needs to select the check in / checkout option from the available menu item from home screen.
- Once he select the check in/ check out menu, attendance marking page will be displayed.

- Now, user needs to select type of attendance/ mode of attendance from the drop down menu.
- In case of NFC method of attendance, app will display this mode inside this text box.

- Once user select NFC method of attendance mode, he need to be very near to FFC Tag so that mobile app can read the data available inside the NFC tag to verify the user’s actual location and NFC tag’s location.
- As user come within the range of NFC Tag app will display an alert that” NFC Tag Found”

- If user taps his mobile device onto or near the NFC Tag, app will read the data and validate the same and now user will be able to mark his/ her attendance.
- User will click on check in/ check out button to mark his/ her attendance, and again an alert message will come as ““Attendance Checked in” with Date and time of attendance marked. And by this way user will be able to mark his/ her attendance.

- In case user is away from the NFC Tag, than app will throw an alert message like” NGC Tag not connected. Please wait or move your device position near the NFC Tag”

C) Attendance process using Device Mac Address:
Device Mac address is another way to validate Employee’s device from which he/ she is allowed to mark his/ her attendance. Using unregistered mobile device user will not be able to mark his attendance. So by this way it will again validate and authenticate user who is marking attendance. User can restrict employee to mark his attendance by using his own mobile device and this will improve authenticity of user and marked attendance too as every mobile device has unique ID as Mac address
- For check in/ check out user will login with his login credentials.
- User will select Check in/ check out menu item from the home screen.
- First user has to select the option/ method he is allowed to mark his/ her attendance. In this case user has to select Device Mac Address method to do so.

- Once that method of attendance is selected by the user from drop down, it will not give an option to check in/ checkout attendance using the buttons.
- User will click on Check In button to mark his/ her attendance.
- App will check/ validate the Device Mac address in back ground, and if validated and registered Device is found it will allow check in or checkout.

- If registered device not found, than at the time of check in/ check out app will display an alert message like “Device Mac Address doesn’t matched”

D) Attendance process using Geo Location:
- User will login using his/ her login credentials into the mobile app and select the attendance check in/ check out option from menu item.
- First user has to select the option/ method he is allowed to mark his/ her attendance. In this case user has to select Geo Location method to do so.

- Once that method of attendance is selected by the user from drop down, it will give an option to select the location from where he is willing to check in or heck out or the location he is allowed to mark his attendance. If multiple locations are allowed to him than he will select the location where he is standing at that moment. If only single location is allowed to him than that location will be displayed by default to him

- User will click on Check In button to mark his/ her attendance.
- Once the location has been selected by the user, app will automatically validate his current location that weather he is in defined and registered geo fence or not. Using google geo location map and latitude/ longitude.
- If the user is in defined geo fence area than he/ she will be able to mark his/ her attendance.
- User will click on Check in/ check out button to mark his/ her attendance.
- Finally, he will be able to mark the attendance successfully.

- If user is out of defined and registered geo location, app will throw an alert like ”Please go inside the geo fence area to mark your attendance”
Supervisor Mode of Attendance Check-in/ Checkout
This functionality is provided for user to punch their attendance without Login into the application using their individual login credentials. (Quite similar like Bio Metric machine attendance system)
Once User/ Supervisor login into the app using his/ her own login credentials, all the staff members/ users list will be displayed (all the allowed and under his supervision staff list). Now all the relevant staff members can punch their attendance using that supervisor login.
- Supervisor login into the app using his/ her login credentials.
- Supervisor will click on Right most top icon available on home screen post login.

- Here, on supervisor mode of attendance scree, user will get an option to select his/ her name from the given drop down menu.

- Once user selects his/ her name from the drop down, user will select the type of attendance he is allowed or registered already to do so from the drop down.
- Only the permission/ allowed type of attendance type will be displayed there in drop down menu for which particular user has been allowed and registered.

- Once user selects the type of attendance type, the respective method of check in/ check out will be displayed.
- User will follow the instructions and procedure to mark his/ her attendance as per the pre explained methods.
- Once user check in/ check out, an alert message containing check in/ check out time of successfully punching will be displayed.
- Once first user checks in/ checks out the screen will be again in fresh mode of attendance punching from where another user has to select his/ her name from the drop down to mark his/ her attendance as explained above.
Check In/ Check Out using Mobile’s Finger Scanner
This functionality for check in and check out will work in case particular employee is using his/ her personal Mobile phone to mark attendance and if Finger Scan feature is inbuilt inside the mobile phone as now a days most of the mobile phones having such facility
The user can mark his attendance using the same finger which is already registered with his mobile’ finger scanner, if user has not registered his finger using mobile’ finger scanner than first needs to register the same before using this app for check in/ check out.
Once user is registered with the finger than the below steps will allow him/her to mark the attendance using Tip Top Mobile app.
- Once user log in into the app and go to attendance check in / check out page.
- Here, user need to select the type of attendance/ mode of attendance, allowed and registered mode will be displayed in drop down and user will select the same.

- Once type of attendance is selected, its relevant options will be displayed inside the app.

- If Bio metric attendance mode is allowed to this user, than app will ask about type of finger print device user want to use for check in/ check out.

- If user select the type of device as Scan through Mobile than app will allow him to punch his/ her attendance using his Mobile’ Finger Scanner.
- User will click on Check in button and app will show the alert to use Mobile’ Finger Scanner in order to scan the registered finger.

- Here, app will identify and validate the scanner finger (user will touch the mobile’s finger scanner using his registered finger) and if the correct and registered finger is scanned, than attendance will be marked successfully and an alert message will be displayed containing the time of attendance check in/ check out.

- If user does not scan the registered or correct finger than app will display an alert to use the right finger to mark attendance
Scheduling
Employee Shift Assignment
https://tiptopmanager.net/Roaster/EmpShift?pageId=2857

Let’s know how to assign shift to employee?
1. Select Company from drop down list.
2. Select Department from drop down list.
3. Select Employee Name from drop down list.
4. Select From Date and To Date from Calendar.
5. Click On Submit Button.

Attention
Buttons display after selecting the fields and these buttons are; Remove Attendance, Insert Update Attendance and Remove Leave.
• Remove attendance buttons, it is used to remove the attendance record for particular employee for date range.
• Insert Update Attendance, it is used to insert and update the attendance record for particular employee for date range.
• Remove Leave, it is used to remove leave record for particular employee for date range.
6. Click on Shift Button for assigning shift.

On click, pop up form will appear showing all shifts under leave group assigned to employee.
Select any shift from the list, by mark check on checkbox.

Once Shift selected, Click on Checkbox ‘Only For Selected date’ and for New Shift Assignment than also Click on checkbox ‘New Shift’.
Click On return button

7. Once all date assigned shift is showing than click on Submit button.

This completes the Employee Shift Assignment process and now if approval level is defined than form will redirect to Approval Shift form.
Employee Shift Approval
Scheduling Video
Scheduling Shortcuts
Auto Scheduling
Auto Scheduling can be done by two ways:
1. First time when New Employee is Joined and by selecting New Shift , the shift will applicable from the date to future.
2. Secondly, By selecting 7 days and selecting Keep Same Pattern for future.

Advanced Scheduling
Overtime visibility
Giving your team schedule flexibility
Viewing labour costs while scheduling
Managing Employees
Overview
This section covers as how to add, manage and remove user/users from the company.
Attention:
All users which are linked with company are termed as Business Users. As these users has business identity and can access their company roles and permission only when they login with entering company name in login page.
Get Started
Step 1. From Business User section click on Manager Business User

Step 2. Page will show Tenant, Assigned Business user and Add/Edit Business User.
Attention:
Assigned Business User Section only displays list of business users for the Tenant.

Step 3. Click on Add/Edit Business User.

Step 4. By default this will display Admin user

Step 5. Adding New User in Organization, user needs to be assign to JobID (designation).
Step 6. Click on Assign Button.
Step 7. Enter User Id – Alpha Numeric Code
Step 8. Click on Get User
A checkbox will appear in front of Organization Structure, Assign Designation To User.
Step 9. Click on Next To add.
Page will show Designation Link, With two types of designation having checkbox.
Reporting Designation – Where User will be reporting for Work
Default Designation – Where user will be paid
Click on Save .
Communicating with your Team
Tip Top Mail is a dynamic business email solution for businesses and enterprise organization. It is a cloud-based architecture and let your data managed by you giving 100 % data privacy and security.
TTMAIL Features
1. One Communication Platform for entire communication requirements of the organization
2. The Platform provides chat, notification , Messmail ( Message and mailing all in one place)
3. Unique zero inbox communication engine that uses the OGM Object networks. These networks work as a bridge in the whole ecosystem, track all the communication and automatically group them by objects and open and close for all users based on Object Status reducing communication load by 50%
4. Message Threading by Objects
5. Conversations threading by subjects
6. Object Driven communication is precise and no unwanted communication is used for performance tracking
7. Decoupled Data layer with encryption gives full data control to organization
8. The analyzer engine tracks the real time communication performance by creating Effectiveness and Efficiency scores
9. "One Message and Multiple Mailboxes in place of Multiple message and Multiple Mailboxes" - This feature reduces data size by 1500% and also give one version of truth for all
10. "One click mail Box creation and one click Mailbox deletion"- The moment the user is linked to Organization this feature is automatically done
11. Role Driven mailbox as messages move to the role in place of forwarding
A. Implementation Guide
TTMail Page View

Company Mail Folder
It is a license mail service to Business User who has business account in the system.
Personal Mail Folder
Inbox
Discussion
Activity Report
Draft
Send
Close
Completed
Deleted
View Mail
Compose Mail
1.1 Click on New Message Button for composing message. User need to select folder from which mailbox message need to compose.
Fig. Showing New Message compose from Business(GKV Group) Mailbox .

2. A Blank Message Form will display
Fig. Showing Message View

3. Setting Priority On Message based on Message Importance Level.

• Send - Used to Perform Message Send Action
• Save as Draft - Used to Save Message and can be send later as per user need. Message will save in draft folder in Mail List Section.
• Cancel - Used to cancel Message
• Upload - Used to upload File, Picture, etc
• Mail - ( Need To Send Message as Mail)
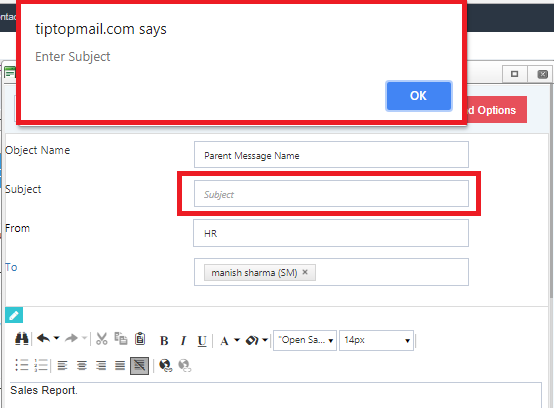
• Send Options - Hide Fields ( Object Name, Subject, From and To) for User display ease in composing message.)
• Object Name - Main Topic Or Parent Subject Name, this functionality given to user for unifying message Subject by Making One Subject Parent and Another Subject Child, Wherein Parent Subject will be Unique and Subject can be Multiple Child Subject Message Used on Different Context related to Parent Subject Message.)
• Subject - Child Subject Name, used to divided the message in different Groups based on different Subject matter requirement however their Communication is Grouped by One Parent Subject.)
• From - Shows User Identity based on Mailbox Selected, Like If Business (GKV Group) Mailbox Selected then from will display HR i.e. Business Identity however in Personal Mailbox Showing "Samarth" is user personal identity.)
• To - User can select contact participants to whom Message will be send.)
• Restore/ Maximize - To adjust size of Message Form)
• Close - To close Message Form)
2. Send Mails
Once Message is composed , Click on Send Button

Key Points To take care before sending Messages.
1. Enter Parent Subject Name or else TTMail will show alert

2. Enter Subject Name or else TTMail will show alert

3. Select Participants from Contact List or else TTMail will Show Alert

Alert will display showing Message Sent Successfully.
Read Mails
All mails which are read by user will show as read.
Mark Mails as Read.
1. Select All UnRead Mails which needs to mark Read. Use Checkbox for selection.

2. Apply Status Read on Selected Mails

Unread Mails
All Mails which are unread will show in bold.
Select all Read Mails and Click on Unread Mail Button. Once Process done all mails will show Unread Mails.

Reply Mails

Reply All Mails

Forward Mails

Close Mails

Complete Mails

Follow Up Mails


Sorting Of Follow Up Mails can be apply by click on Button F and All Mails will sort.
Know Your Communication Score
Click on star Button.


Know Your Effective Score


Search Mails


Print Mails


Add New Conversion Mails

Add Contacts
How to add participants when no contacts are added in TTMail.
Click on New Message Button, Click on To Button

Add Contact Form View:


Add Successfully Contact

Already Exist Contact

Zero Inbox Feature
TTMail Views

Desktop View

Tablet View

Mobile View

Expand / Collapse Button


Editing an Employee’s Availability
https://tiptopbusiness.com/Handover/StaffGrooming.aspx?type=1&pageId=138
Grooming Form - Is used to Monitor employee in operational, scheduling , Training and checking performance progress.
Editing Employee Availability can be done by clicking on Time Icon
It will direct to employee shift assignment page where employee shift can be changed.

Interpreting Availability While Scheduling
Same grooming form can be used to check all task allocated to particular employee and accordingly can manage
while scheduling. Tasks can be checked by click on icon
Processing Requests
Submitting Time Off Requests for Employees
Employee Leave Application
http://tiptopmanager.net/Roaster/LeaveApplication?pageId=2853

• Using this particular form supervisor or reporting authority can apply for leave on behalf of under supervision employee. On this form employees’ leave balance will also be displayed.
• Supervisor/ User will select the name of company first under which that employee designated.
• Select the name of employee from the drop down menu item. And employee code will be displayed on this form below employee name.
• Than User will select the Leave type, leave date range, number of days from the provided menus.
• User will enter the reason for leave along with address while employee will be on leave.
• Now User will click on Submit button to save and to send this leave application to next level for approval.
Leave Application Status
It is page where just a view of leave applied by employee shows. (No Use)
Employee Leave Approval
https://tiptopmanager.net/Roaster/ApproveLeave?pageId=142
Page View – Showing No Leave Application Record.

Page View – Showing Status Types

Page View – Showing Approved Leaves records

Page View – Showing Employee Name Filter Used to View Approved Leave Records

• Using this form the User or the designation that is authorized to approve any employees’ leaves can approve or reject leaves as applied.
• On this form User can search the pending application, approved application and discarded application as well.
• Form will display the available and applied leaves with employee leave details as he filled during leave application as name of employee, department, leave type, date and reason for leave.
• User will click on Approve link to approve particular leave application or he can click on discard link to dis approve as well.
Time Off Requests
Shift Requests
OpenShift Requests
Getting Started with Attendance
Setting Up Time Clock Terminals
Clocking In/Out: Terminal/PersonalComputer / iPhone / Android
Tracking Unpaid Breaks
Take Lunch - Time Clock Terminal /Personal Computer? / Mobile App
Automatically Deduct Scheduled Breaks
Running Payroll
Tip Top Payroll
Tip Top Payroll is one of the key modules in HUMS. This is used to calculate the remuneration of each employee with respect to the work performed (Attendance) by them. It not only consists of remuneration, but also the other benefits that the organization has to provide for the employee welfare according to different company laws policy
Integration with Other Modules for Payroll processing are; Time Management, Employee Administration, Incentives & Wages and Finance & Accounting.
Purpose
This document is the Implementation Guide – User Manual of Tip Top Payroll and intended to provide all the necessary information to use the system and processes.
The implementation Guide is designed to adjust the Tip Top System and Applications to the requirements of a new customer. You use the implementation guide to structure and organize the implementation of Tip Top Systems and applications in your company
Implementation guide is a hierarchical structure of the applications areas in the component hierarchy. It contains all the work steps required for the implementation with documentation
2. System and Role & Permission
2. System and Role & Permission
• 2. System and Role & PermissionWindows 10, 8, 7
• 64-bits operating system
• 2GB of RAM available
• An Internet Connection to access the sites and applications
• Browser – Chrome / Mozilla Firefox
Other operating system users like Apple (Mac) can use Safari Browser.
User Roles and Permissions
| Role and Permission | Module | Description |
|---|---|---|
| Attendance Admin | Roster Module | Role to give permission to user to access all Attendance/ Shift related forms in HRM module |
| Roaster Admin | Roster Module | Role to assign rights to user for assigning Employee Shift |
| Roaster Admin | Roster Module | Role to assign rights to user for assigning Employee Shift |
| Salary Admin | Payroll Module | Role to give permission to user who can see the salary forms and who can process salary |
Salary Password
Only Salary Admin Role User can process salary by entering salary password.
Currently it is same password used in Login Tip Top Application.

3. Process Flow
User can follow the below process flow and can complete Salary Process.
1. Set Company Payroll Rule (Set Payroll Rule in Attendance Status)
2. Set payroll Rule in Leave Group
3. Set Payroll Head
4. Set Pay Formula
5. Assign Pay Formula on Attendance Status
6. Select Set off Rule
7. Add Salary Figure, Leave Group and Shift to Employee
8. Attendance Record
9. Process Salary and Adjustments
10. Salary Payment
3.1 Set Company Payroll Rule (Set Payroll Rule in Attendance Status)
To Know about Attendance Status – Please Refer Roster Module Page No.
Steps to Set Payroll Rule in Attendance Status:
1. Go To https://tiptopmanager.net/User/ListType?type=1&pageId=1313
2. Select any Attendance Status and Click on Add Payroll Rule button

This section used to add Payroll Rule for Attendance Status.
Payroll Rule means defining and setting Quantity & Period with Credit and Debit Rule on occurrence. Company as per their Leave Policy can set how much Quantity? , At which period? And what rule i.e. Credit or Debit to be applied when record occur?
3. Add or Edit Payroll Rule
https://tiptopmanager.net/User/EffecivetPayRollRuleMaster?ID=382

Form showing below fields:
1. Company (When Open This field will be prefilled and Non Editable).
2. Attendance Status (When Open This field will be prefilled and Non Editable).
3. Is Effective (Checkbox) – Select only those attendance Status which need to include in defining payroll rule.
4. Attendance Type – Column showing list of all Attendance Status created under company.
5. Option (List) – Select Period from the List
6. No. Of Working Days/ Option (Textbox) – Enter Frequency of Period
7. No. Of Leaves (Textbox) – Enter No. of Quantity
8. Credit Balance (Textbox) – Enter Quantity to be credited when occur
9. Debit Balance (Textbox) – Enter Quantity to be debited when occur
10. Is Paid (Checkbox) These are pre checked when attendance status were set.
11. Is earned (Checkbox) These are pre checked when attendance status were set.
Click on Save for updating the record filled on the form or else Cancel.
3.2. Set payroll Rule in Leave Group
https://tiptopmanager.net/User/LeaveGroupDetailList?pageId=2871

How to Add Payroll Rule in Leave Group?
1. Above Page Displays all leave group, select the company and leave group and click on expand button.
2. Expand button will show all the attendance status for which payroll rule has been defined in company payroll rule master will show same, but can change the rule based on leave group by selecting each attendance status and modifying the rule.

3. Click on Modify Rule

4. Click on Save or cancel.
3.3. Set Payroll Head
https://tiptopmanager.net/User/SalaryHeads?pageId=157

Definition
To maintain a master data record in system, there are different Payroll Heads to be define for processing payroll rule.
Payroll Heads Like;
1. Basic Salary
2. Allowances
3. Wages
And can add many more based on company payroll policy.
Add Salary Head

When adding Salary Head few key points need to consider like;
1. Which all company or companies will this salary head will be apply?
2. Unique Code for Salary Head.
3. Payroll Head Name.
4. Will the calculation based on Attendance or Daily Pay?
Edit Salary Head

Enter all the fields and Click on Save button.
Delete Salary Head
Salary Head cannot be deleted if it is used in other forms of payroll.
3.4. Set Pay Formula
https://tiptopmanager.net/User/PayFormula?pageId=2917

You can create formula for calculation of Salary. Pay Formula page shows Add, edit and search button.
Add

Following Details need to determine before set up pay formula; Name, Description, for which company, define formula with used of mathematical factors operator, Factor and Product Factor.
Factor Operator: Means From Total Salary Figure what will be Factor Apply to find Formula Rate Like;
Example:
Employee has Salary INR 10000 and Factor Operator is selected (/) means divide to Factor (Days in Month), so than 10000/30(days in month) = 333.33
Formula Rate – 333.33
Factor: Means what will be days in month, days in year or anything to be apply on factor operator to come up with figure which will be further apply on product operator.
Product Operator – Means which function will apply on formula rate?
Example:
Figure (Salary /(Factor Operator) Factor ) Product Operator – Salary
Employee salary INR 10000
Factor Operator - / (Divide)
Factor – Days in Month
Product Operator - * (Multiple)
So, 10000/30= 333.33 Formula Rate
Formula Rate 333.33 * Record in Salary Process (29 Present) = 9666.67
Edit

• Select the pay formula from list and click on edit.
• Modify the fields as per company policy and click on save.
• If need to Passive than uncheck the Is Active checkbox.
Active – Will be live and show in all payroll forms.
Passive – Will be inactive and will not show in other payroll forms.
3.5. Assign Pay Formula on Attendance Status
https://tiptopmanager.net/User/AttendancePayFormula?pageId=2914
Definition
This form is used to set Pay Formula to Attendance Status also marking balance Type as Debit or Credit.
Page View

Edit / Update pay Formula

1. Select Attendance Status from the List and Click on Edit Button.
2. Apply Balance Type as Credit or Debit.
3. Salary Head – Select from list , in which way head this record will reflect.
4. Formula – Select Pay Formula from List
5. Set Roundoff
6. If need Roundup Option than select Checkbox
7. If need Reverse Balance – Than select Checkbox
8. Check Active for making it Live.
9. Click On Update for saving the entries else Cancel.
3.6. Select Set Off Rule
https://tiptopmanager.net/Admin/ListType?type=1&pageId=1313

Set off Rule means to choose list of attendance status which will set off (adjust) against Attendance record. This is usually done when Unpaid leave is setoff to Paid Leave.
For Example:
Mr. X employee has 29 Present and 1 Emergency Leave (Unpaid Leave) in attendance record. Total Paid Records will be 29.
Also Emergency Leave can be setoff to Casual Leave and Sick Leave as defined in SetOff Rule form showing in below image.

Than 1 Emergency Record can be setoff to Casual Leave or Sick Leave as per choice but they will only show when they have balance and their display sequence will be as per priority defined in Setoff rule form.
When Casual Leave was setoff than the balance of casual leave will get 1 less.
Hence, 1 Emergency Leave is setoff to Casual Leave( paid leave) and 29 Present. Now total paid records will be 30. So Mr.X employee will get full 30 days salary having attendance record 1 Casual Leave and 29 Present.
3.7. Add Leave Group, Shift and Salary Figure in Employee Administration
A. Adding Leave Group
https://tiptopmanager.net/HRM/Status/activeEmp?pageId=121
1. Go To Active Employee page . https://tiptopmanager.net/HRM/Status/activeEmp?pageId=121.
2. Search Employee by Name and Click on Edit.
3. Click on Leaves Button

4. Select Reporting Company from Company List and Select Leave Group from Leave group List. Page will display leave group details than Enter Effective date from where leave group will be apply to employee.
Click on Update Button.

Above image showing employee leave Group Applied with Leave group name, details and date of effective from.
Now, approve the new update ( Leave Group) in employee details. Go To Add/Approve Employee form.
https://tiptopmanager.net/HRM/Status/InactiveEmp?pageId=120
Select employee and click on Approve button. A popup form will open, go to bottom right and click on final approve. The employee record will get approve and the page will direct to active employee page.
B. Adding Shift
Only after Leave group is added to employee than Shift can be assign to employee.
1. Go To Employee Shift Form https://tiptopmanager.net/Roaster/EmpShift?pageId=2857.
2. Select Company, Department, Employee Name and Select Date of Effective from ( Same which was entered in Leave group Date of Effective from Field).

3. In Shift Field showing by default the Company Default Leave Group Shift. Click on Shift Button and a popup form will open showing all shifts under selected leave group.

Select the Shift which need to assign to employee .Use filter by enter shift code and click on submit.

Select the shift by click on checkbox. Go To Button and also click on checkbox Only for selected date and New Shift.
Now Click on return button

Selected shift will show in shift field and details like Shift code and in and out time with break will display.

Click on Submit Button.

If Approval level is applied than Record will go to Shift Approval Page else it will automatically approve.
Shift Approval Page: https://tiptopmanager.net/Roaster/EmpShiftapprove?pageId=2857
C. Adding Salary Figure in Employee Form
https://tiptopmanager.net/HRM/Status/activeEmp?pageId=121
1. Go To Active Employee page . https://tiptopmanager.net/HRM/Status/activeEmp?pageId=121.
2. Search Employee by Name and Click on Edit.

3. Click on Salary Info

4. Enter Salary Password

5. Fill The Details like; Salary Type (Means Salary Head), Salary Head Amount, Description ( If any).
Multiple Salary Heads can be added with their amount.
• Once Filled, click on Insert Button.
• The Details filled will show in below Box. Click on Confirm, the prompt will appear requiring effective date from which this filled details will be applicable for process. Select the date from the calendar.
• Click on Confirm.
• Go To Add/ Approve Page - https://tiptopmanager.net/HRM/Status/InactiveEmp?pageId=120
• Click on Approve button and go to salary Info page.
• Click Approve Button for approving the details or else disapprove.
Page View – Showing blank Salary Info Page

Salary Info Page – Showing filled salary information with salary history.

Attention:
1. Employee Salary will only be added to employee once employee leave group and shift is assigned. Only after Employee Roster set Up than Employee Salary can be updated. Refer Employee Administration – For Leave Group Assignment and Roster – Employee Shift Assignment.
2. While updating the salary the salary info page can give alert message due to salary figure entered is above or below employee Level and grade. As system has assigned employee Level and grade and each grade is linked with salary range. Hence, if entered salary is not coming in salary range defined in grade than first Employee grade need to correct.
Employee Grade
https://tiptopmanager.net/Admin/EmpGrade?pageId=163

• Select The Company or Companies for which same Grade will be applicable.
• Enter Grade Name.
• Enter Min Range of Salary Figure
• Enter Max. Range of Salary Figure
• Check mark the Active Checkbox.
• Click Save.

Create Grades as many as required as per company policy. Follow the above steps.
Employee Level
https://tiptopmanager.net/Admin/List?type=9&pageId=162

• Select The Company or Companies for which same Grade will be applicable.
• Enter Level Name.
• Select Grade from the List.
• Enter Display Order.
• Check mark the Active Checkbox.
• Click Save

3.8. Attendance Record
http://tiptopmanager.net/Roaster/attendancestatusnew?pageId=2863

This page will display all attendance record for any period by selecting date range.
For Checking attendance record , employee can view their attendance punching record.
3.9 Process Salary and Adjustments
https://tiptopmanager.net/Roaster/ProcessPaySlip
This form is used to process the employee salary month wise.

• Select the start date and end date in which salary has to be processed.
• Select the company name from drop down menu.

• Employee list will be displayed here based on the selected company name.
• Select the name of employee or employees whose salary has to be processed.
• Click on Run Rule Button
• Click on Process Data button to start process the salary calculation.

This Salary process sheet display details like;
• Start and End date – Showing Period of Salary Process.
• Status – Showing Attendance Status.
• On Date – this shows ondate Balance of attendance status.
• Balance – This shows current balance of attendance status.
• Quantity – This shows Attendance record quantity in a period.
• Adjust – This section is used for Adjusting employee attendance records based on special requirements. Due to any reason if employee attendance record need to adjusted by adding more value or reducing the value on Adjust field. Click on Update button to process adjustment.
• Set Off : this icon used to set off attendance status record against other attendance status.
Usually done when any unpaid leave can be setoff to paid leave or Weekly off.

Above image showing employee has 21 Emergency Leaves and For Set off two attendance status are showing with their current balances
Note: Attendance Status showing in list of setoff are defined in Attendance Setoff Rule. Only Attendance status which were selected in Set off rule will show also it only show when balance is available for setoff.
If 21 Emergency Leave need to set off , than in setoff column enter quantity and click on update data. The pop up form will close and salary process sheet will show PL and WO Balance and Emergency leave Quantity 0.
• Review the salary figure and records.
• Once Reviewed, click on Finalize Date.
• Process Salary print – Click on print button in bottom of page.
3.10. Salary Payment:
This section used to view and pay the finalize salary.

Select the company name form list.
Select Salary Type Pending.
Select the Employee or employees from the list.
Click On Load Button

Display all pending Finalize Salary record.
Select all record based on month and click on Make Payment.

• Once click on Make payment, the record will now remove from pending and transfer to paid.
• To View all Payment records of employee, Go To Form again and select company and select Paid in salary Type.
• Click on Load data.
• The page will show all salary payments records of employee month wise.
• Records can be print by click on print button.

4. Reports
1. Company Payroll Rule Report https://tiptopmanager.net/reporting/ReportViewer.aspx?rn=HRM\\2+Roaster\\Company+payroll+rule
2. Shift master https://tiptopmanager.net/reporting/ReportViewer.aspx?rn=HRM\\2+Roaster\\shift+master
3. Employee Leave Group https://tiptopmanager.net/reporting/ReportViewer.aspx?rn=HRM\\0+Master+HRM\\Employee+Leave+Group
4. Leave Group Details https://tiptopmanager.net/reporting/ReportViewer.aspx?rn=HRM\\0+Master+HRM\\Leave+group+detail
5. Employee Leave Balance https://tiptopmanager.net/reporting/ReportViewer.aspx?rn=HRM\\2+Roaster\\Emp+leave+Balance
6. Employee Shift https://tiptopmanager.net/reporting/ReportViewer.aspx?rn=HRM\\2+Roaster\\Employee+Shift
7. Grade master https://tiptopmanager.net/reporting/ReportViewer.aspx?rn=HRM\\0+Master+HRM\\Grade+Master
8. Level and Grade https://tiptopmanager.net/reporting/ReportViewer.aspx?rn=HRM\\0+Master+HRM\\LEAVE_GRADE_PAYROLLMASTER
Reviewing Employees’ Timesheets
3.9 Process Salary and Adjustments
https://tiptopmanager.net/Roaster/ProcessPaySli
This form is used to process the employee salary month wise.

• Select the start date and end date in which salary has to be processed.
• Select the company name from drop down menu.

• Employee list will be displayed here based on the selected company name.
• Select the name of employee or employees whose salary has to be processed.
• Click on Run Rule Button
• Click on Process Data button to start process the salary calculation.

This Salary process sheet display details like;
• Start and End date – Showing Period of Salary Process.
• Status – Showing Attendance Status.
• On Date – this shows ondate Balance of attendance status.
• Balance – This shows current balance of attendance status.
• Quantity – This shows Attendance record quantity in a period.
• Adjust – This section is used for Adjusting employee attendance records based on special requirements. Due to any reason if employee attendance record need to adjusted by adding more value or reducing the value on Adjust field. Click on Update button to process adjustment.
• Set Off : this icon used to set off attendance status record against other attendance status.
Usually done when any unpaid leave can be setoff to paid leave or Weekly off.

Above image showing employee has 21 Emergency Leaves and For Set off two attendance status are showing with their current balances.
Note: Attendance Status showing in list of setoff are defined in Attendance Setoff Rule. Only Attendance status which were selected in Set off rule will show also it only show when balance is available for setoff.
If 21 Emergency Leave need to set off , than in setoff column enter quantity and click on update data. The pop up form will close and salary process sheet will show PL and WO Balance and Emergency leave Quantity 0.
• Review the salary figure and records.
• Once Reviewed, click on Finalize Date.
• Process Salary print – Click on print button in bottom of page.
Finalize & Export Payroll
This section used to view and pay the finalize salary.

Select the company name form list.
Select Salary Type Pending.
Select the Employee or employees from the list.
Click On Load Button

Display all pending Finalize Salary record.
Select all record based on month and click on Make Payment.

• Once click on Make payment, the record will now remove from pending and transfer to paid.
• To View all Payment records of employee, Go To Form again and select company and select Paid in salary Type.
• Click on Load data.
• The page will show all salary payments records of employee month wise.
• Records can be print by click on print button.

Payslips

Advanced Features Hire
Track and Hire Applicants
Page highlight Job Vacancy and Click on Publish to make it visible on company Website for view.


Click on View to display Job Specification

Create & Distribute Job Postings
Tasks
How Tasks Work
Workspace comprises of-
• My Hub
• Initiative
• Meeting Agenda
• My Trainings
• Checklist
• Checklist Master
• My Task
• Milestones
• Approve
• Closed
Let us examine each tab individually-
My Hub-
My Hub is a collection of the User’s Tasks, work he is supposed to do, assigning and approving of work.

On Expanding My Hub, the User gets to explore four areas which are-
1. Current Actions- User can view his ongoing work and reply to conversations which are pending.
2. New Task- The user can open new task which he wishes to achieve.
3. Assigned- The user can view the tasks which are assigned to him.
4. Assigned Approve- This is where the user approves of certain roles which are given to him.

Current actions: Here, user can view his ongoing work and reply to conversations which are pending.
This is how the user can reply the message in current actions.

User has to click in add new message and then he can write the message by selecting participant. Also user can give rating from 1 to 5 according to the work done however if rating is below than 3, one form will open where user has to write the reason of bad rating and automatically that complain will get open again.
New task: One can see his open complains (Complains have to resolve) in the new task option, these complain raised by the user who has authority to forward it to the right person.

These are complains in the New task option however if one does accept these then it will go automatically to complains section comes under milestones.
Assigned: The user can view the tasks which are assigned to him.
Assigned Approve: This is where the user approves of certain roles which are given to him.
Initiative-Initiative is when the User decides his possibilities of work, his capabilities and designs a Work plan to achieve these Goals.

Initiative consists of two things-
1. To Decide: The user decides as to what all he can do.
2. To Achieve: Once the user has decided as to what all possibilities he has got, he can then work out a strategy to achieve those goals.

Meeting Agenda
The user decides on a list of things which are to be discussed in a meeting in this particular section.

Meeting agenda consists of-
My Training-
The user can view all his Trainings which he wishes to participate in this tab.

My Training
The user can view his Trainings under this tab

Checklist
Checklist lets the user to match his work with the To-do list he makes. He can check whether anything is missed out or not, some unfinished tasks which needs to be completed

Checklist Master-

My Task
This tab specifies the user’s task and has various sub-categories in it.

My Task consists of
1. To Complete- Tasks which are pending to be completed can be viewed here.
2. Delegated Assign- The task which assigned to some other person on behalf of other, in other words task assign to the back up of the person who is not present.
3. Pending Approval- Task which the user has done, but awaiting approval.
4. Upcoming- Future Tasks.
5. Pause-Tasks which has paused as they aren't important right now but will be doing in the future.
6. To Check- These are the tasks which display the Checklist Items.
7. Owner- Owner has the rights to assign and approve the tasks.
8. Finished- Work which the user has finished.
9. Complete- Task does complete comes in this category.
Milestones
As we know Milestones are measurable and observable and serve as progress makers, the user can set his Milestones in this section.

Milestones comprises of
1. Reservations- The user can check the Reservations from here.
2. Complains- User can review all complains rose by different persons that related to him and resolve it with the required action.
3. Defects & Appreciations- User can view his own achievements and defects.
4. Projects- All projects assigned to the user can be viewed here.
5. Pending- All the tickets which are pending for approval can be seen here.
6. Completed- Tasks which are completed appear here.
7. Owner- User can view his Ownership in various Projects.
Approve
The user can approve all the tasks assigned to him.

Sub-categories of Approve are-
1. To Approve- User has to be approved.
2. Delegated Approve- Some other person who took responsibility on behalf of you approving tasks.
Closed
Work which is completed from the User’s end will appear in Closed Tab.

Monitoring tasks
It can be happen by periodic Notifications and Tasks Score in each employee Dashboard and Grooming form
Completing Tasks: iPhone / Android Reporting
Tasks can be completed on any device having browser to access TTmail website.